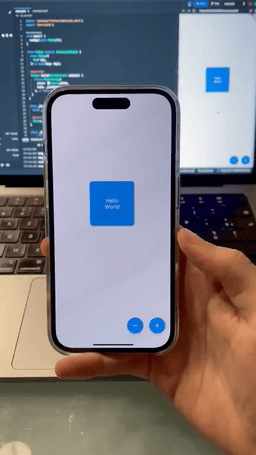
You may already know how to use Flutter to create simple animations. But what if we could turn these straightforward widgets into gorgeous animations? Let’s get started and learn how to make it happen, beginning with the amazing animation down below ????.
So, let’s start
Either start a fresh Flutter project or utilise an already-existing one. Since the animation’s black hole is an image, let’s include it in the project. Let’s now construct our animation page, which I’m going to refer to as CardHiddenAnimationPage.
class CardHiddenAnimationPage extends StatefulWidget {
  const CardHiddenAnimationPage({Key? key}) : super(key: key);

  @override
  State<CardHiddenAnimationPage> createState() =>
      CardHiddenAnimationPageState();
}

class CardHiddenAnimationPageState extends State<CardHiddenAnimationPage>
    with TickerProviderStateMixin {
  final cardSize = 150.0;

  @override
  Widget build(BuildContext context) {
    return Scaffold(
      floatingActionButton: Row(
        mainAxisSize: MainAxisSize.min,
        children: [
          FloatingActionButton(
            onPressed: () {},
            child: const Icon(Icons.remove),
          ),
          const SizedBox(width: 20),
          FloatingActionButton(
            onPressed: () {},
            child: const Icon(Icons.add),
          ),
        ],
      ),
      // TODO: add body
    );
  }
}
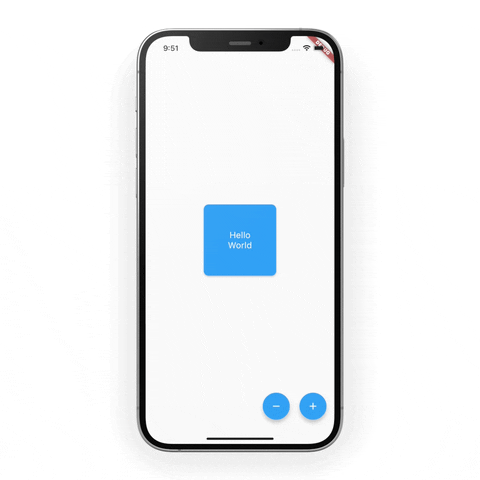
It’s a StatefulWidget with TickerProviderStateMixin where we have two floating buttons on the bottom right side and define the cardSize = 150
Black hole animation
The idea is straightforward: when the minus button is pressed, a black hole appears and then vanishes momentarily. The Tween widget comes in quite handy in situations just like this one. I’ll demonstrate how.
late final holeSizeTween = Tween<double>(
  begin: 0,
  end: 1.5 * cardSize,
);
late final holeAnimationController = AnimationController(
  vsync: this,
  duration: const Duration(milliseconds: 300),
);
double get holeSize => holeSizeTween.evaluate(holeAnimationController);Next, we need to ensure that animation changes are listened, and it’s crucial to dispose of it appropriately when it’s no longer needed.
@override
void initState() {
  holeAnimationController.addListener(() => setState(() {}));
  super.initState();
}

@override
void dispose() {
  holeAnimationController.dispose();
  super.dispose();
}We are done with the animation setup. Now, let’s put it on the page. Just change TODO: add body to the below code????
body: Center(
  child: SizedBox(
    height: cardSize * 1.25,
    width: double.infinity,
    // TODO: wrap Stack with ClipPath
    child: Stack(
      alignment: Alignment.bottomCenter,
      clipBehavior: Clip.none,
      children: [
        SizedBox(
          width: holeSize, // animate the black hole
          child: Image.asset(
            'images/hole.png',
            fit: BoxFit.fill,
          ),
        ),
        // TODO: Hello world card
      ],
    ),
  ),
),It’s show time! Let’s return to the minus floating action button and make its onPressed function asynchronous.
FloatingActionButton(
  onPressed: () async {
    await holeAnimationController.forward();
    Future.delayed(const Duration(milliseconds: 200),
        () => holeAnimationController.reverse());
  },
  ....
)What we’re aiming to do here is let the animation finish first, wait 200 milliseconds, and then reverse the animation.
Card animation
First, let’s make a card. I’m going to call it HelloWorldCard
class HelloWorldCard extends StatelessWidget {
  const HelloWorldCard({
    Key? key,
    required this.size,
    required this.elevation,
  }) : super(key: key);

  final double size;
  final double elevation;

  @override
  Widget build(BuildContext context) {
    return Material(
      elevation: elevation,
      borderRadius: BorderRadius.circular(10),
      child: SizedBox.square(
        dimension: size,
        child: DecoratedBox(
          decoration: BoxDecoration(
            borderRadius: BorderRadius.circular(10),
            color: Colors.blue,
          ),
          child: const Center(
            child: Text(
              'Hello\nWorld',
              textAlign: TextAlign.center,
              style: TextStyle(color: Colors.white, fontSize: 18),
            ),
          ),
        ),
      ),
    );
  }
}Now, change TODO: Hello world card to the code given below
Positioned(
  child: Center(
    child: Transform.translate(
      offset: Offset(0, 0), // TODO: Animate the offset
      child: Transform.rotate(
        angle: 0, // TODO: Animate the angle
        child: Padding(
          padding: const EdgeInsets.all(20.0),
          child: HelloWorldCard(
            size: cardSize,
            elevation: 2, // TODO: Animate the elevation
          ),
        ),
      ),
    ),
  ),
),We’re getting close. The hello world card and the black hole have been introduced. The idea is for the card to slide downward, spin somewhat, then rise in elevation when the user hits the minus button. We’ll employ the same Tween method that we used to animate the hole size in order to accomplish that.
late final cardOffsetAnimationController = AnimationController(
  vsync: this,
  duration: const Duration(milliseconds: 1000),
);

late final cardOffsetTween = Tween<double>(
  begin: 0,
  end: 2 * cardSize,
).chain(CurveTween(curve: Curves.easeInBack));
late final cardRotationTween = Tween<double>(
  begin: 0,
  end: 0.5,
).chain(CurveTween(curve: Curves.easeInBack));
late final cardElevationTween = Tween<double>(
  begin: 2,
  end: 20,
);

double get cardOffset =>
    cardOffsetTween.evaluate(cardOffsetAnimationController);
double get cardRotation =>
    cardRotationTween.evaluate(cardOffsetAnimationController);
double get cardElevation =>
cardElevationTween.evaluate(cardOffsetAnimationController);In the initState, add the listener for observing changes
cardOffsetAnimationController.addListener(() => setState(() {}));Don’t forget to dispose of it when it’s no longer needed
cardOffsetAnimationController.dispose();Let’s back to our HelloWorldCard and update the values for offset, angle, and elevation. Once these changes are completed, it should look like this ????
Positioned(
  child: Center(
    child: Transform.translate(
      offset: Offset(0, cardOffset), // Offset updated
      child: Transform.rotate(
        angle: cardRotation, // angle updated
        child: Padding(
          padding: const EdgeInsets.all(20.0),
          child: HelloWorldCard(
            size: cardSize,
            elevation: cardElevation, // elavetion updated
          ),
        ),
      ),
    ),
  ),
),Returning to the minus button, also start the card animation upon its click
holeAnimationController.forward();
await cardOffsetAnimationController.forward();
Future.delayed(const Duration(milliseconds: 200),
() => holeAnimationController.reverse());The cardOffsetAnimationController’s duration is configured to 1000 milliseconds. I want it to hold off on reversing the hole animation until the card animation is finished. Put await before the cardOffsetAnimationController as a result.
Finally, all we have to do is invert the animations on the + button.
The cardOffsetAnimationController’s duration is configured to 1000 milliseconds. I want it to hold off on reversing the hole animation until the card animation is finished. Put await before the cardOffsetAnimationController as a result.
Finally, all we have to do is invert the animations on the + button.
cardOffsetAnimationController.reverse();
holeAnimationController.reverse();
The wall — CustomClipper
The card displays the black hole and animates as planned, but it falls short of producing the desired impact. We want to create the illusion that the card is travelling in the direction of the black hole and then coming back out of it. With ClipPath and CustomClipper, we can complete this. Let’s start by creating the CustomClipper, which I’m going to name BlackHoleClipper.
class BlackHoleClipper extends CustomClipper<Path> {
  @override
  Path getClip(Size size) {
    final path = Path();
    path.moveTo(0, size.height / 2);
    path.arcTo(
      Rect.fromCenter(
        center: Offset(size.width / 2, size.height / 2),
        width: size.width,
        height: size.height,
      ),
      0,
      pi,
      true,
    );
    // Using -1000 guarantees the card won't be clipped at the top, regardless of its height
    path.lineTo(0, -1000);
    path.lineTo(size.width, -1000);
    path.close();
    return path;
  }

  @override
  bool shouldReclip(BlackHoleClipper oldClipper) => false;
}At TODO: wrap Stack with ClipPath, wrap the Stack widget with ClipPath and assign BlackHoleClipper as the clipper.
....
ClipPath(
  clipper: BlackHoleClipper(),
  child: Stack( .... ),
)
....